
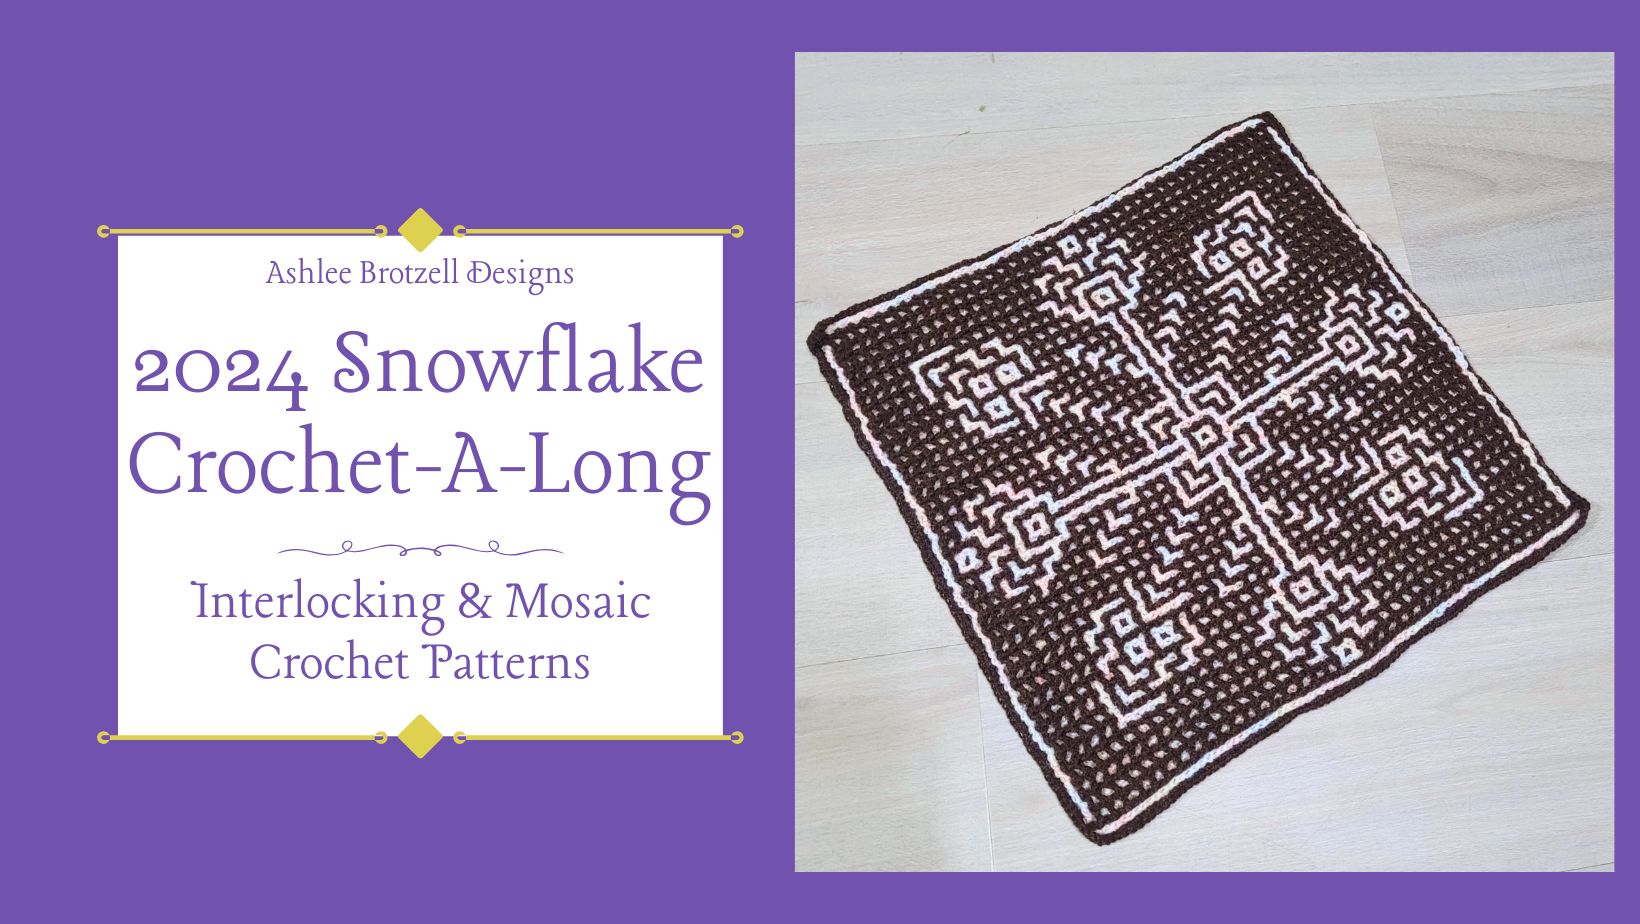
Magic Decanter Crochet-A-Long
Interlocking Crochet:
Yardage and Foundation Rows
June 2023 CAL
This is the first time I’m hosting a CAL (Crochet-A-Long) using an older pattern instead of something brand new.
Magic Decanter was originally published in May 2021. This throw blanket can be done using the interlocking crochet or overlay mosaic crochet technique.
Interlocking Crochet
This page is the introduction for the interlocking crochet version of Magic Decanter.
Free Written Pattern
I like it when everyone can join in a CAL, so I’m putting the full line-by-line written pattern here on my website for free viewing.
Paid Option
You can purchase an ad-free, printable PDF that includes the full written pattern and charts for both techniques, or you can follow along with the free written pattern here on my website!
CAL Discount
Save 40% on Magic Decanter for the duration of the CAL. No code needed, just add it to your cart to see the discount applied; offer valid on Ravelry and Etsy. Expires 11:59 pm CST August 8, 2023.

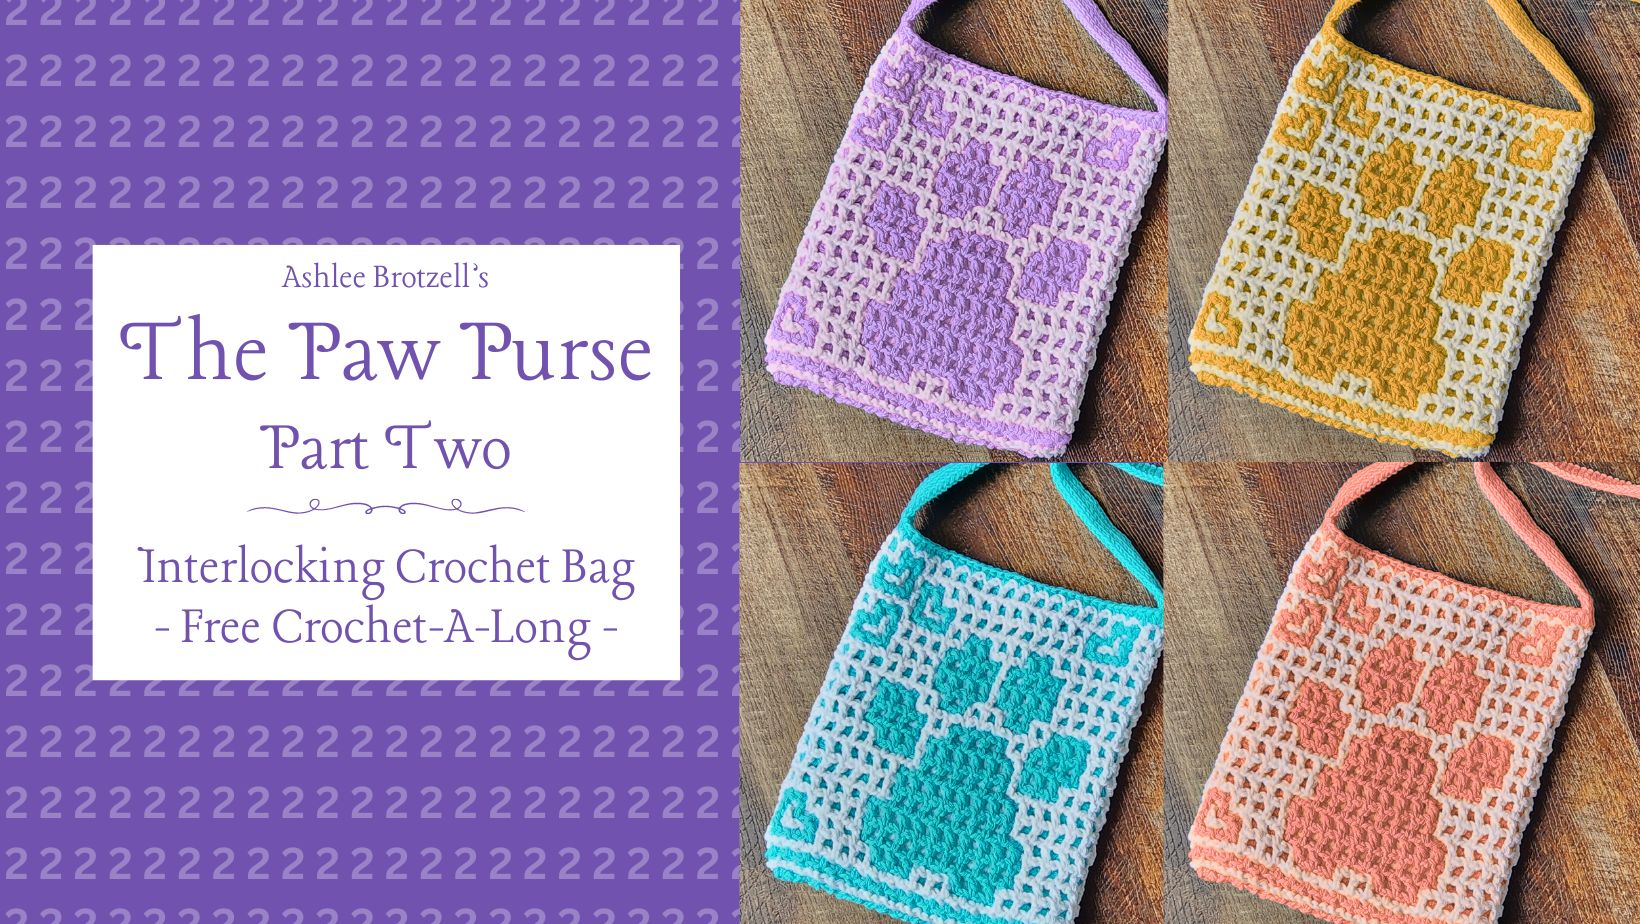
Part TWO: Interlocking Crochet Spring Market Bag CAL
This is part two of my Interlocking Crochet Spring Market Bag Crochet-A-Long. As part of my 5th Designaversary Celebration I’ve updated this pattern and put it here online so we can all crochet together! This bag has two mesh sides and a decorative interlocking crochet strap.
Today we’ll work on the strap.
The written pattern will be available on my website here (scroll down) for free in two parts or you can purchase an ad-free, printable PDF.

Part TWO
When I designed this bag in 2020 I was trying to find a way to make interlocking crochet more approachable.
The mesh panels are made the same way we make the mesh layers when doing interlocking crochet. The stitches are just chain and double crochet.
Part ONE, where we make the mesh panels, can be viewed at https://ashleeslint.com/cals/interlocking-crochet-spring-market-bag/.
Today’s portion might feel a little more daunting because we will be making the interlocking crochet strap!
To be honest, I prefer larger patterns because the rows are longer and you don’t have to keep switching between colors. But I am hoping this small design gives you the practice to understand where the stitches belong and how to keep track of both your current stitch and the previous row’s windows.
CAL Discount
For the month of April 2025, you can save 25% on any of my designs (including this Interlocking Crochet Spring Market Bag) with the code “2025SALE“.

This was one of the first designs I ever published! I used some inexpensive acrylic yarn I had available; it has pilled quite badly over 5 years of use by the kids but it’s still one of their favorite bags!
Spring Market Bag CAL Schedule
This Crochet-A-Long will be posted in two parts.
April 4, 2025: Part One is where we make the mesh sides.
April 11, 2025: Part Two is where we make the interlocking crochet strap. You’ll also have to take a little bit of time to join the pieces together.
It’s not quite a stash-buster but compared to the quantity of yarn needed for one of my blankets this feels like a small, quick project.
– If you share on Instagram, tag me @AshleesLint so I can see your pretty projects!
– If you are in Facebook groups that allow it, share your progress and let others know they can come join in the fun!
– If you’re in my Facebook group, share your progress at any time and upload the photo(s) of your finished blanket in the album!

Interlocking Crochet Technique Help
If you’re unfamiliar with the interlocking crochet technique, I suggest you start with some smaller tutorials and practice squares first.
This pattern does not have a walk-thru video to go with it, but my tutorials should give you the skills you need to read it and do it.
Quick reminder (probably telling the people that don’t need to know): copyright status applies to free patterns as well.
You can see my copyright statement here: https://ashleeslint.com/2021/03/23/copyright/
Important Details
- Cotton worsted weight yarn (390-440 yards total)
- Two 11” mesh squares – 70 yards each, 140 yards total
- Interlocking crochet strap
-
- Main Color (MC) – 15 yards per repeat, 125-150 yards for 70-80” strap
- Accent Color (AC) – 15 yards per repeat, 125-150 yards for 70-80” strap
-
- Body of bag: 11” / 29cm square
- 5 mm hook (H-8)
- Gauge: 7 (DC, ch) x 7 rows = 4”
Key (US terminology)
Some of these terms will only be relevant in part two of the Crochet-A-Long.
AC = accent color (white on chart / background color)
ACB = put AC yarn to the side facing away from you
ACF = bring the AC yarn to the side facing you
B = double crochet (dc) behind, and chain 1
Back = the side not facing you
ch = chain
dc = double crochet: yarn over, insert hook, yarn over, pull up loop, *yarn over, pull through two loops* twice
EB = end stitch in back: using AC, dc into the last AC window, working behind MC
EF = end stitch in front: using AC, dc into the last AC window, working in front of MC
ES = end stitch: dc into the last window space
F = double crochet (dc) in front, and chain 1
Front = the side currently facing you
MC = main color (blue on chart)
RS = right side: the side of your work that will show the finished design
sc = single crochet: insert hook, yarn over, pull up loop, yarn over, pull through both loops
sk = skip a stitch
tr = treble crochet: yarn over twice, insert hook, yarn over, pull up loop, *yarn over, pull through two loops* three times
WS = wrong side: the back of your project
Interlocking Crochet Tips
- Remember, each color is worked into itself only and there is a chain space between each double crochet.
- Don’t confuse RS / WS with Front / Back.
- The interlocking crochet strap will have a pretty side (the Right Side/RS) and a Wrong Side/WS.
- When you’re crocheting, it doesn’t matter which side is facing you, a Front stitch means you work your double crochet in front of the other layer and a Back stitch means you work the double crochet behind the other layer.
- For an explanation of the brackets: https://ashleeslint.com/2020/08/29/brackets-in-crochet-patterns/
Crochet-A-Long: Part Two
We have already made our two mesh panels. So now we need to make the interlocking crochet strap.
This strap is decorative with a simple, repeating design. There’s a plus sign and then a boxy-plus sign, over and over.
You may notice that the written pattern looks a lot longer than it needs to be. When we do interlocking crochet we work two rows and then flip our work and do two more. So the written pattern changes depending on whether we are looking at the right side or wrong side.
Therefore, one repeat of the written pattern will include a plus sign, a boxy-plus sign, and then another plus sign and boxy-plus sign.

One repeat
Repeats
If you’ve used worsted weight yarn and are matching my gauge, each repeat will give you about 8-9″ of strap.
You will need at least 5 repeats in order to get around the body of the bag, and then you’ll need a few more repeats to have a strap that goes over your shoulder or across your body.
Keep in mind how your yarn stretches (acrylic is more stretchy than cotton, but the interlocking crochet technique creates mesh layers that are quite flexible). I measure the strap length by stretching it out before doing the final 3 rows.
To have a strap that will go over my shoulder and allow the bag to hang near my hip I have created a piece 70” long (9 repeats). When updating I used a stiffer yarn and had a looser gauge. I only needed 8 repeats to get a strap 70” long.
When it’s long enough, finish with the final 3 rows.
Counting Rows
One of the common problems I’ve seen is that people get confused on which row they’re on. It’s hard to follow the pattern if you don’t know which row you’re supposed to be crocheting!
It can be difficult counting rows with any crochet pattern, but it’s especially hard when we are trying a new stitch and are unfamiliar with how the designer is doing things.
With my interlocking crochet designs I count the very bottom foundation row as row 0. It’s not really part of the design, it’s just how you start the project. There are other designers who count their rows differently!

Let’s Count Together
- I find it easiest to count rows when looking at the Wrong Side / WS of the project
- I count my Main Color / MC layer and ignore the other layer until I’m at the top (the blue layer is the MC in this photo)
- The bottom line of blue is the foundation row – it counts as row 0
- The first red dot (near the bottom) is on a blue row that we can’t see well because of the white layer; you can see how the other red dots are on blue
- The first red dot is on row 2; I count by putting my fingers in the window. The bottom window has row 0 on the bottom and row 2 on the top, so I would say “2” (referring to the top of that window).
- The next window has row 4 at the top
- I count the blue windows by 2 (2, 4, 6, 8, etc)
- The window where I have a stitch marker is “28”; the red dot below it is 26 and the red dot above it is 28, so with my finger in that window I’d say “28”
- The red top at the very top is row 30 and we see that the white layer is one row taller, so the white row that has been completed is row 31

Stitch Markers
I usually use stitch markers to help me keep track of the rows.
I usually do it every 20 rows, but you might prefer every 10 rows.
With a repeating pattern like this strap, marking every 20 rows isn’t very helpful. We are more interested in knowing what row we are crocheting and less interesting in knowing the total number of rows that have been crocheted.
Therefore,
- I put my stitch marker in the final window of each repeat (comparing to the previous photo with the red dots, the stitch marker has been moved up one window)
- when counting rows to determine what I’m crocheting, I now use this window as “0” and still go up by 2 for each MC window
- I do not use a stitch marker except for to mark the repeats but that means we have to count up to 30 rows every time we forget which row we are on
- You might want to use different colored stitch markers or have some sort of system to tell you which markers are used to count repeats and which are being used to count every 10 rows or whatever helps you stay on track
- Leave the stitch markers until you’re finished the strap so that you know how many repeats you’ve done
Interlocking Crochet Strap
70-80” total length (approx. 225-250 yards of each color). Adjust length if needed.

Foundation Rows
- Using MC create 6 windows:
- I prefer the chainless technique (chain 5, dc into first stitch, chain 1, tr into same space, *chain 1, tr into 2nd part of the previous tr* repeat as many times as needed). See how at https://youtu.be/_3So3Pe8GWc?t=100
- Alternatively, you can chain 15, then DC in 5th chain from your hook. *Ch 1, Sk 1, DC* repeat until the end. Place stitch marker so your work doesn’t unravel.
- With your AC, Ch 13. Pull the tail of your AC through the first MC window on the right end (see picture to the right). DC through the back of the next window into the 5th chain from your hook. See how at https://youtu.be/_3So3Pe8GWc?si=Lmu8M9F60Hv6zRYz&t=321
- *Ch 1, Sk 1, DC through the back* repeat to end. Place stitch marker so your work doesn’t unravel. Both stitch markers should be on the same end.
WS – ACB (wrong side facing you, AC to back)
4 MC – Ch3, 1B, 3F, 1B, ES
5 AC – Ch3 in back, 4B, EB
RS – ACF (right side facing you, AC to front)
6 MC – Ch3, (1F, 1B) x2, 1F, ES
7 AC – Ch3 in front, 1F, 2B, 1F, EF
WS – ACB
8 MC – Ch3, 5B, ES
9 AC – Ch3 in back, 1B, 2F, 1B, EB
RS – ACF
10 MC – Ch3, (1F, 1B) x2, 1F, ES
11 AC – Ch3 in front, 4F, EF
WS – ACB
12 MC – Ch3, 1B, 3F, 1B, ES
13 AC – Ch3 in back, 4B, EB
RS – ACF
14 MC – Ch3, (1F, 1B) x2, 1F, ES
15 AC – Ch3 in front, 1F, 2B, 1F, EF
WS – ACB
16 MC – Ch3, (1B, 1F) x2, 1B, ES
17 AC – Ch3 in back, 4B, EB
RS – ACF
18 MC – Ch3, 1F, 3B, 1F, ES
19 AC – Ch3 in front, 4F, EF
WS – ACB
20 MC – Ch3, (1B, 1F) x2, 1B, ES
21 AC – Ch3 in back, 1B, 2F, 1B, EB
RS – ACF
22 MC – Ch3, 5F, ES
23 AC – Ch3 in front, 1F, 2B, 1F, EF
WS – ACB
24 MC – Ch3, (1B, 1F) x2, 1B, ES
25 AC – Ch3 in back, 4B, EB
RS – ACF
26 MC – Ch3, 1F, 3B, 1F, ES
27 AC – Ch3 in front, 4F, EF
WS – ACB
28 MC – Ch3, (1B, 1F) x2, 1B, ES
29 AC – Ch3 in back, 1B, 2F, 1B, EB
RS – ACF
30 MC – Ch3, (1F, 1B) x2, 1F, ES
31 AC – Ch3 in front, 4F, EF
Repeat Rows 4 through 31 until you reach your desired length. Then finish with rows 32-34. Jump up to the discussion about how many repeats are needed.
You may want to put a stitch marker on each repeat of Row 4 to make counting the rows easier.
WS – ACFront
32 MC – Ch3, 1B, 3F, 1B, ES
33 AC – Ch3 in front, 4F, EF
Cut and tie off AC.
RS
34 MC – Ch3, 5B, ES
Cut and tie off MC, leaving tail long enough for sewing the short ends of the strap together. Be careful not to twist your strap.
Weave in ends.

Joining the Pieces
Decide whether you are sewing your bag together or using a crochet stitch (such as a flat braid join) to join the pieces.
The right side (pretty side) of the strap needs to be facing out.
Put the strap seam in the middle at the bottom of the bag and line up the windows on the mesh sides with the MC windows on the strap.
Using the MC, sew or join with a flat braid join (or other preferred crochet stitch or joining method). Put 2 stitches in each MC window.
Watch this video with a few joining methods: https://youtu.be/UXoh8ungXRs


Make sure you join your strap to only 3 sides of the mesh panel. I got a bit distracted and had to undo some of my work.
Lining the Bag
I won’t be adding a lining to my bag. For me, a market bag is something stretchy and breatheable so I want the open-air mesh sides.
You’re Finished!
Thank you for crocheting with me!
No matter when you you find this pattern or finally finish crocheting your bag, we would LOVE to see your creation!
– If you share on Instagram, tag me @AshleesLint so I can see your pretty projects!
– If you are in Facebook groups that allow it, share your progress and let others know they can come join in the fun!
– If you’re in my Facebook group, share your progress at any time and upload the photo(s) of your finished blanket in the album!


0 Comments